A DIY Guide: Installing Laminate, Engineered, and Solid Wood Flooring
Introduction: Installing laminate, engineered, or solid wood flooring can enhance the beauty and value of your home. Whether you’re a seasoned DIY enthusiast or a first-time homeowner looking to embark on a flooring project, this step-by-step guide will help you achieve professional-looking results. Let’s dive into the process of installing these popular flooring options.
Step 1: Prepare the Subfloor Ensure that the subfloor is clean, dry, level, and structurally sound. Remove any existing flooring and fix any imperfections or unevenness. Use a moisture meter to check the subfloor’s moisture content and ensure it falls within the acceptable range for the specific flooring material.
Step 2: Acclimate the Flooring: Unbox the laminate, engineered, or solid wood flooring and let it acclimate in the installation area for the recommended time, usually 48 to 72 hours. This allows the flooring to adjust to the temperature and humidity of the space, minimizing the risk of warping or buckling later.
Step 3: Lay Underlayment (if required) For laminate or engineered wood flooring, installing underlayment is often necessary to provide cushioning, moisture protection, and noise reduction. Follow the manufacturer’s instructions to lay the underlayment over the entire subfloor, ensuring it is properly aligned and secured. For solid wood flooring, install a layer of felt paper. This will reduce or eliminate any potential squeaking that occurs from floor movement in high traffic areas. Note that with pre-finished hard wood flooring the squeaking occurs between the slats of wood and is virtually impossible to completely eliminate. Coatings are usually polyurethane based and applied on all edges creating the occasional squeaking sound whenever any weight is applied to the surface. A proper installation is vital to reduce or eliminate the possibility of any squeaking.
Step 4: Plan the Layout Plan the layout of the flooring, considering factors like room size, shape, and natural light sources. Measure and mark reference lines on the subfloor to guide the installation process. Begin the installation from the longest straight wall, as it will provide a reference point for aligning the flooring.
Step 5: Install the First Row Start by placing spacers along the walls to create a small expansion gap. Lay the first row of flooring, ensuring the tongue side faces the wall. Use a tapping block and a mallet to snugly fit the planks together. Make sure each row is straight and aligned by using a pull bar and rubber mallet.
Step 6: Continue Installation Continue installing subsequent rows, interlocking the planks according to the manufacturer’s instructions. Stagger the end joints by at least 8 inches for stability and an aesthetic appeal. Use a pull bar, tapping block, and rubber mallet to ensure each plank is securely locked in place.
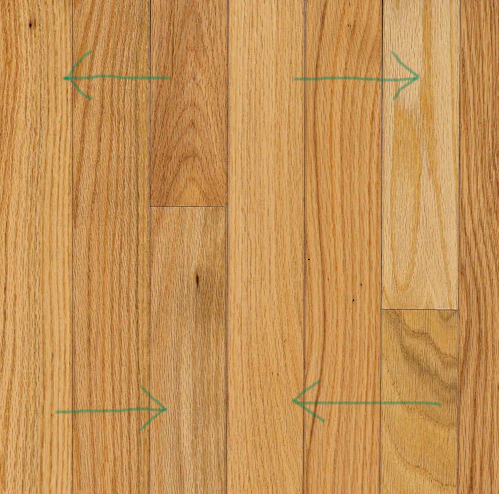
Step 7: Cut and Trim As you approach the walls or obstacles, you will likely need to cut and trim the flooring planks. Use a circular saw, jigsaw, or a miter saw to make accurate cuts. Remember to leave an expansion gap around all fixed objects to allow for natural movement, especially with solid wood. It’s important to understand the structure of wood to understand how it reacts to it’s environment. The cellular structure of wood is longitudinal (parallel) with it’s grain. So when humidity and heat go up, a plank of solid wood will expand. And as the heat and humidity go down, it will contract. Always perpendicular to it’s length. See image below

Expansion & Contraction
Step 8: Finish the Installation: Complete the installation by installing the final row of flooring. Remove spacers and install baseboards or molding to cover the expansion gaps. Use appropriate transition pieces to create smooth transitions between different flooring materials or areas.
Step 9: Cleaning and Maintenance Once the flooring is installed, thoroughly clean it to remove any dust or debris. Follow the manufacturer’s instructions for specific cleaning and maintenance recommendations to keep your new floor looking its best for years to come.
Conclusion: By following these step-by-step instructions, you can confidently install laminate, engineered, or solid wood flooring in your home. Remember to prepare the subfloor properly, plan the layout, use the right tools, and pay attention to manufacturer guidelines. With patience and attention to detail, you’ll enjoy a beautiful, durable, and professionally installed floor that adds value and style to your living space. Happy flooring!