The Maple Carpenter

All posts by The Maple Carpenter

Tools of the Trade

Although the advancement in tool technology has come a long way, it is the old hand tools that a Master carpenter relies on the most. The technology has only accelerated the production.


As a master journeyman carpenter who specializes in a wide range of woodworking projects, you require a diverse set of tools to tackle different tasks with precision and efficiency. Here is an overview of the essential tools you’ll need:

  1. Measuring and Layout Tools:
  • Tape Measure: Used for measuring lengths and dimensions accurately.
  • Combination Square: Enables precise measurements and marking 90-degree angles.
  • Framing Square: Essential for checking and marking angles in framing and layout work.
  • Chalk Line: Helps create straight lines over longer distances.
  1. Cutting and Shaping Tools:
  • Circular Saw: Ideal for making straight cuts in various materials.
  • Miter Saw: Used for making accurate crosscuts and miter angles.
  • Table Saw: Allows for precise rip cuts, bevels, and dado cuts.
  • Jigsaw: Perfect for curved cuts and intricate designs.
  • Hand Saw: Essential for cutting smaller pieces or in areas where power tools are impractical.
  • Router: Enables shaping, edge profiling, and joinery work.
  1. Power Tools:
  • Cordless Drill: Versatile tool for drilling holes and driving screws.
  • Power Drill: More powerful than a cordless drill, suitable for heavy-duty applications.
  • Power Planer: Used for removing material and leveling surfaces.
  • Random Orbital Sander: Ideal for sanding and achieving a smooth finish.
  • Nail Gun: Speeds up the process of nailing, saving time and effort.
  • Circular saw, Miter saw. Table saw
  • Generator, Electric and gas compressors
  1. Hand Tools:
  • Chisels: Essential for fine woodworking, cutting mortises, and shaping.
  • Screwdrivers: Various sizes and types for driving screws.
  • Hammers: Claw hammer for general use and a mallet for delicate work.
  • Pry Bar: Useful for removing nails and dismantling structures.
  • Hand Planes: Allows for precision smoothing, flattening, and shaping of surfaces.
  • Files and Rasps: For refining and shaping wood.
  • Clamps: Various types and sizes for securing workpieces during assembly.
  1. Joinery Tools:
  • Pocket Hole Jig: Simplifies creating strong and concealed joints.
  • Doweling Jig: Used for accurate alignment and drilling of dowel holes.
  • Biscuit Joiner: Enables quick and secure alignment of boards using biscuits.
  • Mortise and Tenon Tools: Chisels and a mortiser for creating strong joints.
  • Dovetail Saw and Chisels: For crafting dovetail joints.
  1. Finishing Tools:
  • Sandpaper and Sanding Blocks: Different grits for smoothing and preparing surfaces.
  • Paint Brushes and Rollers: For applying paint or finishes.
  • Putty Knife: Used for filling holes and cracks with putty or wood filler.
  • Scrapers: For removing old finishes and smoothing surfaces.

Remember, this is just a general overview, and the specific tools required may vary based on individual preferences and projects. As a master journeyman carpenter, your expertise and experience will guide you in expanding your tool collection to meet the unique demands of your craftsmanship. After 40 years of experience I have accumulated far more tools than most people will ever need.

Reviews
Tools of the Trade

Although the advancement in tool technology has come a long way, it is the old hand tools that a Master carpenter relies on the most. The technology has only accelerated the production.


As a master journeyman carpenter who specializes in a wide range of woodworking projects, you require a diverse set of tools to tackle different tasks with precision and efficiency. Here is an overview of the essential tools you’ll need:

  1. Measuring and Layout Tools:
  • Tape Measure: Used for measuring lengths and dimensions accurately.
  • Combination Square: Enables precise measurements and marking 90-degree angles.
  • Framing Square: Essential for checking and marking angles in framing and layout work.
  • Chalk Line: Helps create straight lines over longer distances.
  1. Cutting and Shaping Tools:
  • Circular Saw: Ideal for making straight cuts in various materials.
  • Miter Saw: Used for making accurate crosscuts and miter angles.
  • Table Saw: Allows for precise rip cuts, bevels, and dado cuts.
  • Jigsaw: Perfect for curved cuts and intricate designs.
  • Hand Saw: Essential for cutting smaller pieces or in areas where power tools are impractical.
  • Router: Enables shaping, edge profiling, and joinery work.
  1. Power Tools:
  • Cordless Drill: Versatile tool for drilling holes and driving screws.
  • Power Drill: More powerful than a cordless drill, suitable for heavy-duty applications.
  • Power Planer: Used for removing material and leveling surfaces.
  • Random Orbital Sander: Ideal for sanding and achieving a smooth finish.
  • Nail Gun: Speeds up the process of nailing, saving time and effort.
  • Circular saw, Miter saw. Table saw
  • Generator, Electric and gas compressors
  1. Hand Tools:
  • Chisels: Essential for fine woodworking, cutting mortises, and shaping.
  • Screwdrivers: Various sizes and types for driving screws.
  • Hammers: Claw hammer for general use and a mallet for delicate work.
  • Pry Bar: Useful for removing nails and dismantling structures.
  • Hand Planes: Allows for precision smoothing, flattening, and shaping of surfaces.
  • Files and Rasps: For refining and shaping wood.
  • Clamps: Various types and sizes for securing workpieces during assembly.
  1. Joinery Tools:
  • Pocket Hole Jig: Simplifies creating strong and concealed joints.
  • Doweling Jig: Used for accurate alignment and drilling of dowel holes.
  • Biscuit Joiner: Enables quick and secure alignment of boards using biscuits.
  • Mortise and Tenon Tools: Chisels and a mortiser for creating strong joints.
  • Dovetail Saw and Chisels: For crafting dovetail joints.
  1. Finishing Tools:
  • Sandpaper and Sanding Blocks: Different grits for smoothing and preparing surfaces.
  • Paint Brushes and Rollers: For applying paint or finishes.
  • Putty Knife: Used for filling holes and cracks with putty or wood filler.
  • Scrapers: For removing old finishes and smoothing surfaces.

Remember, this is just a general overview, and the specific tools required may vary based on individual preferences and projects. As a master journeyman carpenter, your expertise and experience will guide you in expanding your tool collection to meet the unique demands of your craftsmanship. After 40 years of experience I have accumulated far more tools than most people will ever need.

Body and Mind: A Fitness Path to Safety

Title: The Significance of Physical Fitness in the Construction Industry

Introduction: The construction industry is a physically demanding field that requires individuals to possess strength, agility, and endurance. Whether you are a do-it-yourselfer tackling home improvement projects or a seasoned professional working on large-scale construction sites, being physically fit is of utmost importance. This essay explores the significance of physical fitness in the construction industry, emphasizing the benefits of stretching, calisthenics, aerobic exercises, and weight lifting in reducing the risk of injuries and enhancing overall performance.

Body:

  1. Flexibility: Flexibility plays a crucial role in the construction industry as it allows workers to perform tasks that involve bending, reaching, and maneuvering in tight spaces. Regular stretching exercises, such as dynamic stretches and yoga, can improve flexibility and increase the range of motion. Flexible muscles and joints reduce the strain on the body during physically demanding activities, thereby reducing the likelihood of sprains, strains, or other related injuries.
  2. Strength: Construction work often involves lifting heavy objects, carrying materials, and operating machinery. Maintaining a strong physique through exercises like weight lifting is essential. Strength training exercises target specific muscle groups, enhancing their capacity to bear heavy loads and reducing the risk of muscle strains and back injuries. A strong body also improves overall stability and balance, enabling workers to navigate challenging construction environments safely.
  3. Endurance: Construction projects can be physically demanding and require sustained effort over extended periods. Building aerobic fitness through activities like jogging, cycling, or swimming improves cardiovascular health and stamina. Increased endurance enables workers to work for longer durations without fatigue, enhancing productivity and reducing the likelihood of accidents caused by physical exhaustion.
  4. Injury Prevention: Physical fitness is directly linked to injury prevention in the construction industry. Fit individuals are less prone to accidents, as their bodies are better equipped to handle the physical demands and stresses associated with construction work. Proper warm-up routines, including stretching and calisthenics, before commencing work, help prepare the body for physical exertion and decrease the risk of muscle pulls, tears, or strains. Additionally, a fit body is more resilient, enabling it to withstand unexpected situations and minimize the impact of falls or other accidents.
  5. Mental Well-being: Physical fitness not only benefits the body but also positively impacts mental well-being. Engaging in regular exercise releases endorphins, which promote feelings of happiness and reduce stress and anxiety levels. The construction industry can be mentally taxing due to its demanding nature and high-pressure deadlines. Being physically fit can alleviate stress, improve focus, and enhance overall mental resilience, ensuring workers can maintain a high level of concentration and make sound decisions on the job site.

Conclusion:

In conclusion, physical fitness is of paramount importance in the construction industry, regardless of whether one is a DIY enthusiast or a professional worker. By incorporating stretching, calisthenics, aerobic exercises, and weight lifting into one’s routine, individuals can enhance their flexibility, strength, endurance, and overall well-being. Physical fitness significantly reduces the likelihood of injuries, improves performance, and promotes a safe working environment. The construction industry thrives when its workers are physically fit, capable of withstanding the physical demands of the job, and equipped with the mental fortitude to excel in challenging conditions. Therefore, investing in one’s physical fitness should be a priority for anyone involved in construction-related endeavors.

Safety
Body and Mind: A Fitness Path to Safety

Title: The Significance of Physical Fitness in the Construction Industry

Introduction: The construction industry is a physically demanding field that requires individuals to possess strength, agility, and endurance. Whether you are a do-it-yourselfer tackling home improvement projects or a seasoned professional working on large-scale construction sites, being physically fit is of utmost importance. This essay explores the significance of physical fitness in the construction industry, emphasizing the benefits of stretching, calisthenics, aerobic exercises, and weight lifting in reducing the risk of injuries and enhancing overall performance.

Body:

  1. Flexibility: Flexibility plays a crucial role in the construction industry as it allows workers to perform tasks that involve bending, reaching, and maneuvering in tight spaces. Regular stretching exercises, such as dynamic stretches and yoga, can improve flexibility and increase the range of motion. Flexible muscles and joints reduce the strain on the body during physically demanding activities, thereby reducing the likelihood of sprains, strains, or other related injuries.
  2. Strength: Construction work often involves lifting heavy objects, carrying materials, and operating machinery. Maintaining a strong physique through exercises like weight lifting is essential. Strength training exercises target specific muscle groups, enhancing their capacity to bear heavy loads and reducing the risk of muscle strains and back injuries. A strong body also improves overall stability and balance, enabling workers to navigate challenging construction environments safely.
  3. Endurance: Construction projects can be physically demanding and require sustained effort over extended periods. Building aerobic fitness through activities like jogging, cycling, or swimming improves cardiovascular health and stamina. Increased endurance enables workers to work for longer durations without fatigue, enhancing productivity and reducing the likelihood of accidents caused by physical exhaustion.
  4. Injury Prevention: Physical fitness is directly linked to injury prevention in the construction industry. Fit individuals are less prone to accidents, as their bodies are better equipped to handle the physical demands and stresses associated with construction work. Proper warm-up routines, including stretching and calisthenics, before commencing work, help prepare the body for physical exertion and decrease the risk of muscle pulls, tears, or strains. Additionally, a fit body is more resilient, enabling it to withstand unexpected situations and minimize the impact of falls or other accidents.
  5. Mental Well-being: Physical fitness not only benefits the body but also positively impacts mental well-being. Engaging in regular exercise releases endorphins, which promote feelings of happiness and reduce stress and anxiety levels. The construction industry can be mentally taxing due to its demanding nature and high-pressure deadlines. Being physically fit can alleviate stress, improve focus, and enhance overall mental resilience, ensuring workers can maintain a high level of concentration and make sound decisions on the job site.

Conclusion:

In conclusion, physical fitness is of paramount importance in the construction industry, regardless of whether one is a DIY enthusiast or a professional worker. By incorporating stretching, calisthenics, aerobic exercises, and weight lifting into one’s routine, individuals can enhance their flexibility, strength, endurance, and overall well-being. Physical fitness significantly reduces the likelihood of injuries, improves performance, and promotes a safe working environment. The construction industry thrives when its workers are physically fit, capable of withstanding the physical demands of the job, and equipped with the mental fortitude to excel in challenging conditions. Therefore, investing in one’s physical fitness should be a priority for anyone involved in construction-related endeavors.

Climbing the Ladder: To Safety


The Significance of Proficient Ladder Usage in Construction Environments

Introduction: Ladders are indispensable tools in the construction industry, serving as versatile equipment for reaching elevated areas, accessing rooftops, and performing a multitude of tasks. Whether it is a step ladder, extension ladder, or scaffolding, understanding the correct installation, angles, and adherence to health and safety procedures are paramount. This essay delves into the importance of knowing how to use ladders effectively in construction environments, emphasizing the significance of proper setup and the consequences of improper ladder usage.

Ensuring Safety: The foremost reason for comprehending ladder usage lies in the realm of safety. Construction sites pose inherent risks, and accidents involving ladders can result in severe injuries or even fatalities. According to the Occupational Safety and Health Administration (OSHA), falls from ladders accounted for a significant portion of injuries in the construction industry. It is estimated that more than 20,000 occupational injuries and nearly 100 fatalities occur each year in the United States, and in Canada, it’s the second largest cause of accidental death due to ladder-related incidents.

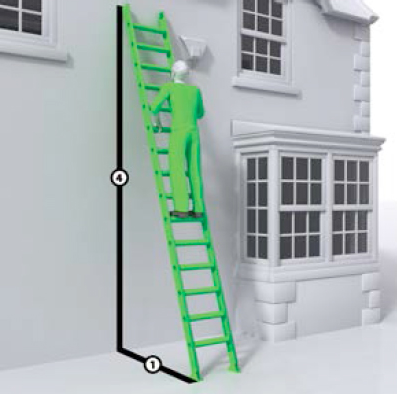
Proper Installation and Angles: Understanding the correct installation of ladders is crucial to ensuring their stability and preventing accidents. Step ladders must be placed on a level surface, with their spreaders fully extended and locked into position. Extension ladders should be set up at a safe angle, utilizing the “4-to-1 rule,” which dictates that for every four feet of height, the base of the ladder should be one foot away from the supporting structure. This ensures stability and minimizes the risk of the ladder slipping or toppling over.

Following Health and Safety Procedures: Construction environments demand strict adherence to health and safety procedures to mitigate risks and protect workers. Knowledge of ladder usage encompasses understanding weight limits, properly securing the ladder, avoiding overreaching, and maintaining three points of contact while climbing or working on the ladder. It is imperative to follow the guidelines provided by regulatory bodies such as OSHA and receive appropriate training to ensure the safe utilization of ladders in construction settings.

Types of Ladder-Related Injuries: The consequences of improper ladder usage can be severe and range from minor injuries to debilitating accidents. Workers may suffer sprains, strains, fractures, dislocations, and head injuries from falls or ladder instability. Moreover, ladder-related incidents can lead to long-term disabilities, resulting in reduced productivity, increased healthcare costs, and potential legal consequences for employers. By prioritizing ladder safety, the construction industry can significantly reduce these statistics and create a safer working environment.

Training and Education: To mitigate ladder-related accidents, comprehensive training and education programs must be implemented within the construction industry. Employers should ensure that workers receive proper instruction on ladder usage, emphasizing the correct installation, setup, and adherence to safety protocols. Familiarity with different ladder types and their specific applications is also crucial. By investing in training and promoting a safety-conscious culture, construction companies can significantly reduce the number of ladder-related incidents and foster a more secure work environment.

The importance of knowing how to use ladders proficiently in construction environments cannot be overstated. Proper installation, angles, and adherence to health and safety procedures are paramount to preventing accidents, injuries, and fatalities. The construction industry must recognize the significance of ladder safety and prioritize comprehensive training programs for workers. By doing so, we can foster a culture of safety, reduce the alarming statistics surrounding ladder-related incidents, and ensure the well-being of construction professionals.

Safety
Climbing the Ladder: To Safety


The Significance of Proficient Ladder Usage in Construction Environments

Introduction: Ladders are indispensable tools in the construction industry, serving as versatile equipment for reaching elevated areas, accessing rooftops, and performing a multitude of tasks. Whether it is a step ladder, extension ladder, or scaffolding, understanding the correct installation, angles, and adherence to health and safety procedures are paramount. This essay delves into the importance of knowing how to use ladders effectively in construction environments, emphasizing the significance of proper setup and the consequences of improper ladder usage.

Ensuring Safety: The foremost reason for comprehending ladder usage lies in the realm of safety. Construction sites pose inherent risks, and accidents involving ladders can result in severe injuries or even fatalities. According to the Occupational Safety and Health Administration (OSHA), falls from ladders accounted for a significant portion of injuries in the construction industry. It is estimated that more than 20,000 occupational injuries and nearly 100 fatalities occur each year in the United States, and in Canada, it’s the second largest cause of accidental death due to ladder-related incidents.

Proper Installation and Angles: Understanding the correct installation of ladders is crucial to ensuring their stability and preventing accidents. Step ladders must be placed on a level surface, with their spreaders fully extended and locked into position. Extension ladders should be set up at a safe angle, utilizing the “4-to-1 rule,” which dictates that for every four feet of height, the base of the ladder should be one foot away from the supporting structure. This ensures stability and minimizes the risk of the ladder slipping or toppling over.

Following Health and Safety Procedures: Construction environments demand strict adherence to health and safety procedures to mitigate risks and protect workers. Knowledge of ladder usage encompasses understanding weight limits, properly securing the ladder, avoiding overreaching, and maintaining three points of contact while climbing or working on the ladder. It is imperative to follow the guidelines provided by regulatory bodies such as OSHA and receive appropriate training to ensure the safe utilization of ladders in construction settings.

Types of Ladder-Related Injuries: The consequences of improper ladder usage can be severe and range from minor injuries to debilitating accidents. Workers may suffer sprains, strains, fractures, dislocations, and head injuries from falls or ladder instability. Moreover, ladder-related incidents can lead to long-term disabilities, resulting in reduced productivity, increased healthcare costs, and potential legal consequences for employers. By prioritizing ladder safety, the construction industry can significantly reduce these statistics and create a safer working environment.

Training and Education: To mitigate ladder-related accidents, comprehensive training and education programs must be implemented within the construction industry. Employers should ensure that workers receive proper instruction on ladder usage, emphasizing the correct installation, setup, and adherence to safety protocols. Familiarity with different ladder types and their specific applications is also crucial. By investing in training and promoting a safety-conscious culture, construction companies can significantly reduce the number of ladder-related incidents and foster a more secure work environment.

The importance of knowing how to use ladders proficiently in construction environments cannot be overstated. Proper installation, angles, and adherence to health and safety procedures are paramount to preventing accidents, injuries, and fatalities. The construction industry must recognize the significance of ladder safety and prioritize comprehensive training programs for workers. By doing so, we can foster a culture of safety, reduce the alarming statistics surrounding ladder-related incidents, and ensure the well-being of construction professionals.

Septic Tanks & Fields


Understanding Septic Systems: Types, Sizing, and Soil Preparation

Introduction: Septic systems play a crucial role in waste management for homes and properties not connected to municipal sewer systems. They consist of septic tanks, septic fields (also known as leaching fields or drain fields), and related components. In this essay, we will explore the different types of septic tanks and fields, their optimal location on lots, how to calculate the appropriate tank size based on home size, the details of soil preparation for leaching fields, and the differences of a holding tank system for waterfront lots.

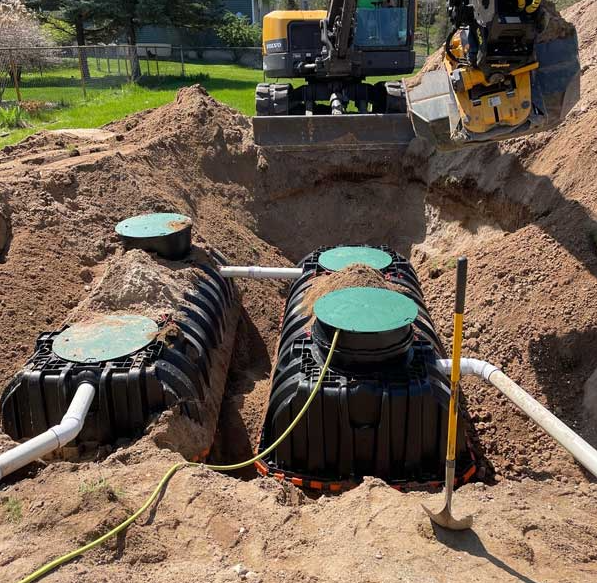
Types of Septic Tanks: Septic tanks are typically made of concrete, fiberglass, or plastic, and they serve as the primary treatment and sedimentation chambers for wastewater. The three main types of septic tanks are:

  1. Conventional Septic Tanks: These tanks have two compartments to separate solid waste from liquids and allow for natural decomposition of solids. Effluent from the septic tank flows into the drain field for further treatment.
  2. Aerobic Treatment Units (ATUs): ATUs introduce air into the tank to promote the growth of aerobic bacteria, resulting in enhanced wastewater treatment. These tanks are ideal for properties with poor soil conditions or higher effluent demands.
  3. Advanced Treatment Systems: These systems utilize additional technologies such as sand filters, activated sludge, or recirculating media filters to achieve higher levels of wastewater treatment. They are commonly used in areas with strict environmental regulations or specific requirements.

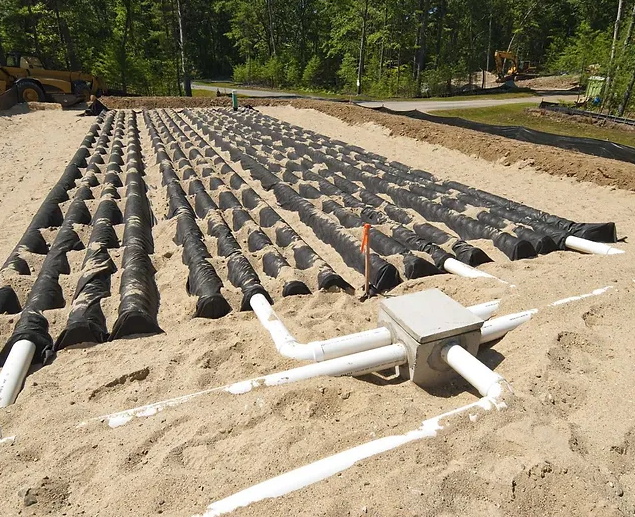
Septic Fields and Location on Lots: Septic fields, also known as leaching fields or drain fields, receive the treated effluent from the septic tank and facilitate its safe dispersal into the soil. Proper location and sizing are essential for their optimal functioning. Septic fields should be situated downhill or away from wells, water bodies, and property boundaries to prevent contamination. It’s important to know that the minimum distance between your well and septic tank and field is 15 meters (50′). This is why in many municipalities your lot must be a minimum of .5 acres.

Calculating Tank Size Based on Home Size: Determining the appropriate septic tank size is crucial to ensure efficient waste management. The size of the tank is primarily determined by the number of bedrooms or the water usage of the home. Local regulations often provide guidelines and formulas to calculate the required tank capacity. For example, a common rule of thumb is that a three-bedroom house typically requires a 1,000-gallon (3785L) tank. Consulting with a local septic system professional is recommended to ensure compliance with regulations and accurate sizing.

Soil Preparation and Function of Leaching Fields: The success of a septic system heavily relies on the leaching field’s soil composition and preparation. Here are the key steps involved in soil preparation:

  1. Percolation Test: Conduct a percolation test to assess the soil’s ability to absorb and treat wastewater. This test determines the soil’s percolation rate, which helps determine the size of the leaching field.
  2. Soil Evaluation: Evaluate the soil’s texture, composition, and depth. Coarse-grained soils, such as sandy soils, tend to drain better than fine-grained soils like clay.
  3. Excavation and Grading: Excavate the area for the leaching field, ensuring proper slope for effluent flow. Proper grading helps prevent surface water from entering the leaching field.
  4. Gravel Bed and Pipe Installation: Install a layer of gravel beneath the perforated distribution pipes to improve drainage and prevent clogging.
  5. Vegetation Control: Remove trees, shrubs, and other vegetation that may interfere with the leaching field’s function. Planting grass over the field promotes evapotranspiration and enhances treatment.

Septic Holding Tanks: Necessity for Waterfront Properties and Proximity to Bodies of Water

Introduction: Septic holding tanks are an essential component of wastewater management systems, especially in areas near bodies of water and waterfront properties. Unlike traditional septic systems that rely on soil absorption, holding tanks store wastewater until it can be properly treated and disposed of. In this essay, we will explore the reasons why holding tanks are required for properties close to bodies of water and waterfront areas, and their significance in protecting water quality and the environment.

Waterfront Properties and Environmental Concerns: Waterfront properties, by their very nature, present unique challenges in terms of wastewater management. These properties are typically located near lakes, rivers, or coastal areas, which makes the protection of water quality a paramount concern. Wastewater discharge from septic systems has the potential to contaminate nearby water bodies, leading to adverse effects on aquatic life, ecosystems, and public health.

The Importance of Septic Holding Tanks:

  1. Water Table and Soil Conditions: Waterfront areas often have high water tables, meaning that the distance between the ground surface and the water table is minimal. This limits the soil’s ability to effectively treat and filter wastewater before it reaches the water bodies. Holding tanks provide a safe and reliable alternative to on-site wastewater treatment in such situations.
  2. Flood Risk: Waterfront properties are susceptible to flooding, especially during heavy rainfalls or storms. In the event of flooding, conventional septic systems can malfunction, leading to the release of untreated wastewater into the surrounding environment. Holding tanks mitigate this risk by securely storing wastewater until floodwaters recede and treatment facilities become operational.
  3. Environmental Regulations: Many jurisdictions have specific regulations governing wastewater management for waterfront properties. These regulations often require the use of holding tanks to ensure the protection of water quality and prevent contamination of sensitive ecosystems. Compliance with these regulations is crucial to maintain the sustainability and ecological integrity of water bodies.

Benefits of Septic Holding Tanks:

  1. Enhanced Environmental Protection: Holding tanks act as an effective barrier, preventing untreated wastewater from reaching nearby water bodies. This significantly reduces the risk of contamination and helps preserve the quality of the water environment.
  2. Flexibility and Adaptability: Holding tanks provide property owners with flexibility in managing their wastewater. They can be emptied and serviced at regular intervals, ensuring proper treatment and disposal in accordance with environmental regulations. Holding tanks can also be combined with other treatment technologies, such as disinfection systems, to further enhance wastewater treatment before final disposal.
  3. Peace of Mind for Property Owners: By installing holding tanks, waterfront property owners can have peace of mind, knowing that they are contributing to the protection and conservation of water resources. Holding tanks offer a reliable and responsible solution for managing wastewater in sensitive areas, reducing potential health hazards and environmental risks.

Conclusion: Septic holding tanks play a crucial role in safeguarding water quality and protecting sensitive ecosystems in proximity to bodies of water and waterfront properties. By preventing the release of untreated wastewater, these tanks help ensure the sustainable use and enjoyment of water resources. Their implementation and adherence to environmental regulations are essential for maintaining a healthy environment and preserving the natural beauty of waterfront areas.

Well & Septic
Septic Tanks & Fields


Understanding Septic Systems: Types, Sizing, and Soil Preparation

Introduction: Septic systems play a crucial role in waste management for homes and properties not connected to municipal sewer systems. They consist of septic tanks, septic fields (also known as leaching fields or drain fields), and related components. In this essay, we will explore the different types of septic tanks and fields, their optimal location on lots, how to calculate the appropriate tank size based on home size, the details of soil preparation for leaching fields, and the differences of a holding tank system for waterfront lots.

Types of Septic Tanks: Septic tanks are typically made of concrete, fiberglass, or plastic, and they serve as the primary treatment and sedimentation chambers for wastewater. The three main types of septic tanks are:

  1. Conventional Septic Tanks: These tanks have two compartments to separate solid waste from liquids and allow for natural decomposition of solids. Effluent from the septic tank flows into the drain field for further treatment.
  2. Aerobic Treatment Units (ATUs): ATUs introduce air into the tank to promote the growth of aerobic bacteria, resulting in enhanced wastewater treatment. These tanks are ideal for properties with poor soil conditions or higher effluent demands.
  3. Advanced Treatment Systems: These systems utilize additional technologies such as sand filters, activated sludge, or recirculating media filters to achieve higher levels of wastewater treatment. They are commonly used in areas with strict environmental regulations or specific requirements.

Septic Fields and Location on Lots: Septic fields, also known as leaching fields or drain fields, receive the treated effluent from the septic tank and facilitate its safe dispersal into the soil. Proper location and sizing are essential for their optimal functioning. Septic fields should be situated downhill or away from wells, water bodies, and property boundaries to prevent contamination. It’s important to know that the minimum distance between your well and septic tank and field is 15 meters (50′). This is why in many municipalities your lot must be a minimum of .5 acres.

Calculating Tank Size Based on Home Size: Determining the appropriate septic tank size is crucial to ensure efficient waste management. The size of the tank is primarily determined by the number of bedrooms or the water usage of the home. Local regulations often provide guidelines and formulas to calculate the required tank capacity. For example, a common rule of thumb is that a three-bedroom house typically requires a 1,000-gallon (3785L) tank. Consulting with a local septic system professional is recommended to ensure compliance with regulations and accurate sizing.

Soil Preparation and Function of Leaching Fields: The success of a septic system heavily relies on the leaching field’s soil composition and preparation. Here are the key steps involved in soil preparation:

  1. Percolation Test: Conduct a percolation test to assess the soil’s ability to absorb and treat wastewater. This test determines the soil’s percolation rate, which helps determine the size of the leaching field.
  2. Soil Evaluation: Evaluate the soil’s texture, composition, and depth. Coarse-grained soils, such as sandy soils, tend to drain better than fine-grained soils like clay.
  3. Excavation and Grading: Excavate the area for the leaching field, ensuring proper slope for effluent flow. Proper grading helps prevent surface water from entering the leaching field.
  4. Gravel Bed and Pipe Installation: Install a layer of gravel beneath the perforated distribution pipes to improve drainage and prevent clogging.
  5. Vegetation Control: Remove trees, shrubs, and other vegetation that may interfere with the leaching field’s function. Planting grass over the field promotes evapotranspiration and enhances treatment.

Septic Holding Tanks: Necessity for Waterfront Properties and Proximity to Bodies of Water

Introduction: Septic holding tanks are an essential component of wastewater management systems, especially in areas near bodies of water and waterfront properties. Unlike traditional septic systems that rely on soil absorption, holding tanks store wastewater until it can be properly treated and disposed of. In this essay, we will explore the reasons why holding tanks are required for properties close to bodies of water and waterfront areas, and their significance in protecting water quality and the environment.

Waterfront Properties and Environmental Concerns: Waterfront properties, by their very nature, present unique challenges in terms of wastewater management. These properties are typically located near lakes, rivers, or coastal areas, which makes the protection of water quality a paramount concern. Wastewater discharge from septic systems has the potential to contaminate nearby water bodies, leading to adverse effects on aquatic life, ecosystems, and public health.

The Importance of Septic Holding Tanks:

  1. Water Table and Soil Conditions: Waterfront areas often have high water tables, meaning that the distance between the ground surface and the water table is minimal. This limits the soil’s ability to effectively treat and filter wastewater before it reaches the water bodies. Holding tanks provide a safe and reliable alternative to on-site wastewater treatment in such situations.
  2. Flood Risk: Waterfront properties are susceptible to flooding, especially during heavy rainfalls or storms. In the event of flooding, conventional septic systems can malfunction, leading to the release of untreated wastewater into the surrounding environment. Holding tanks mitigate this risk by securely storing wastewater until floodwaters recede and treatment facilities become operational.
  3. Environmental Regulations: Many jurisdictions have specific regulations governing wastewater management for waterfront properties. These regulations often require the use of holding tanks to ensure the protection of water quality and prevent contamination of sensitive ecosystems. Compliance with these regulations is crucial to maintain the sustainability and ecological integrity of water bodies.

Benefits of Septic Holding Tanks:

  1. Enhanced Environmental Protection: Holding tanks act as an effective barrier, preventing untreated wastewater from reaching nearby water bodies. This significantly reduces the risk of contamination and helps preserve the quality of the water environment.
  2. Flexibility and Adaptability: Holding tanks provide property owners with flexibility in managing their wastewater. They can be emptied and serviced at regular intervals, ensuring proper treatment and disposal in accordance with environmental regulations. Holding tanks can also be combined with other treatment technologies, such as disinfection systems, to further enhance wastewater treatment before final disposal.
  3. Peace of Mind for Property Owners: By installing holding tanks, waterfront property owners can have peace of mind, knowing that they are contributing to the protection and conservation of water resources. Holding tanks offer a reliable and responsible solution for managing wastewater in sensitive areas, reducing potential health hazards and environmental risks.

Conclusion: Septic holding tanks play a crucial role in safeguarding water quality and protecting sensitive ecosystems in proximity to bodies of water and waterfront properties. By preventing the release of untreated wastewater, these tanks help ensure the sustainable use and enjoyment of water resources. Their implementation and adherence to environmental regulations are essential for maintaining a healthy environment and preserving the natural beauty of waterfront areas.

Well Water Filtration

Over my 40 years of building experience I also acquired training and experience as a licensed water operator in a commercial environment. From biological to chemical composition, types of wells and septic systems, to routine maintenance and sampling. This was valuable education to understanding the importance of the water we use for domestic consumption and how delicate the surrounding environment is and to constantly be conscious of how to protect it.

Water Filtration: Enhancing the Quality of Your Home’s Water Supply

Clean and safe water is essential for our health and well-being. In a world where water quality can vary, implementing effective water filtration systems is crucial. In this essay, we will explore the different types of water filters, the importance of proper well location, and the various equipment used for water extraction and filtration. From setup to maintenance, understanding these aspects will empower homeowners to make informed decisions and ensure access to high-quality water.

  1. Types of Water Filters: a. Carbon Filters: Carbon filters are commonly used for general water filtration purposes. They remove impurities and contaminants, including chlorine, volatile organic compounds (VOCs), and unpleasant odors or tastes. Activated carbon’s porous structure absorbs impurities, resulting in cleaner, better-tasting water.

b. UV Filters: UV filters utilize ultraviolet light to disinfect water by deactivating bacteria, viruses, and other microorganisms. This type of filter is effective in killing harmful pathogens without altering the taste, odor, or chemical composition of water.

c. Sediment Filters: Sediment filters are designed to remove larger particles such as sand, silt, iron particles, and debris from the water. These filters prevent sediment from entering the water supply and clogging downstream appliances or pipes.

  1. Well Types and Location: a. Dug Wells: Dug wells are shallow wells that rely on groundwater from the water table. They are typically constructed by excavating a hole in the ground and lining it with materials to prevent collapse. Dug wells are more susceptible to contamination from surface runoff and require proper filtration systems to ensure water quality.

b. Drilled Wells: Drilled wells are deeper and constructed by drilling into the ground to access water reservoirs below the water table. These wells provide a more reliable and protected water source, as they tap into deeper, naturally filtered water.

The location of a well on the property is crucial. It should be situated away from potential contamination sources such as septic systems, livestock areas, or chemical storage. Proper well placement minimizes the risk of contamination and ensures a cleaner water supply.

  1. Water Extraction Equipment: a. Jet Pumps: Jet pumps are commonly used in shallow wells. They are surface-mounted and work by creating suction to draw water from the well. Jet pumps are efficient for water depths up to 25 feet and require a separate pressure tank for water storage.

b. Submersible Pumps: Submersible pumps are installed inside the well and are suitable for deeper wells. They are submerged in water and push it to the surface using a series of impellers and motors. Submersible pumps are more efficient for deeper water extraction and eliminate the need for a separate pressure tank.

  1. Setup and Maintenance: Proper installation and regular maintenance of water filtration systems are essential for their optimal performance. It is advisable to consult a professional to ensure accurate installation and alignment of the filtration equipment. Routine maintenance includes regular filter replacement or cleaning, system checks, and monitoring water quality. Maintaining a maintenance schedule helps to prolong the lifespan of the filters and ensure the continued effectiveness of the water filtration system.

Water filtration plays a critical role in ensuring clean and safe water for your household. Understanding the different types of water filters, the importance of well location, and the equipment used for water extraction empowers homeowners to make informed decisions. Carbon filters, UV filters, and sediment filters are designed to address specific contaminants and enhance water quality. Proper well location minimizes the risk of contamination, while different water extraction equipment, such as jet pumps and submersible pumps, cater to varying well depths. Finally, regular maintenance and adherence to recommended schedules ensure the longevity and effectiveness of water filtration systems. By investing in proper water filtration, homeowners can feel comfortable and confident that the water they are consuming is clean and safe.

Well & Septic
Well Water Filtration

Over my 40 years of building experience I also acquired training and experience as a licensed water operator in a commercial environment. From biological to chemical composition, types of wells and septic systems, to routine maintenance and sampling. This was valuable education to understanding the importance of the water we use for domestic consumption and how delicate the surrounding environment is and to constantly be conscious of how to protect it.

Water Filtration: Enhancing the Quality of Your Home’s Water Supply

Clean and safe water is essential for our health and well-being. In a world where water quality can vary, implementing effective water filtration systems is crucial. In this essay, we will explore the different types of water filters, the importance of proper well location, and the various equipment used for water extraction and filtration. From setup to maintenance, understanding these aspects will empower homeowners to make informed decisions and ensure access to high-quality water.

  1. Types of Water Filters: a. Carbon Filters: Carbon filters are commonly used for general water filtration purposes. They remove impurities and contaminants, including chlorine, volatile organic compounds (VOCs), and unpleasant odors or tastes. Activated carbon’s porous structure absorbs impurities, resulting in cleaner, better-tasting water.

b. UV Filters: UV filters utilize ultraviolet light to disinfect water by deactivating bacteria, viruses, and other microorganisms. This type of filter is effective in killing harmful pathogens without altering the taste, odor, or chemical composition of water.

c. Sediment Filters: Sediment filters are designed to remove larger particles such as sand, silt, iron particles, and debris from the water. These filters prevent sediment from entering the water supply and clogging downstream appliances or pipes.

  1. Well Types and Location: a. Dug Wells: Dug wells are shallow wells that rely on groundwater from the water table. They are typically constructed by excavating a hole in the ground and lining it with materials to prevent collapse. Dug wells are more susceptible to contamination from surface runoff and require proper filtration systems to ensure water quality.

b. Drilled Wells: Drilled wells are deeper and constructed by drilling into the ground to access water reservoirs below the water table. These wells provide a more reliable and protected water source, as they tap into deeper, naturally filtered water.

The location of a well on the property is crucial. It should be situated away from potential contamination sources such as septic systems, livestock areas, or chemical storage. Proper well placement minimizes the risk of contamination and ensures a cleaner water supply.

  1. Water Extraction Equipment: a. Jet Pumps: Jet pumps are commonly used in shallow wells. They are surface-mounted and work by creating suction to draw water from the well. Jet pumps are efficient for water depths up to 25 feet and require a separate pressure tank for water storage.

b. Submersible Pumps: Submersible pumps are installed inside the well and are suitable for deeper wells. They are submerged in water and push it to the surface using a series of impellers and motors. Submersible pumps are more efficient for deeper water extraction and eliminate the need for a separate pressure tank.

  1. Setup and Maintenance: Proper installation and regular maintenance of water filtration systems are essential for their optimal performance. It is advisable to consult a professional to ensure accurate installation and alignment of the filtration equipment. Routine maintenance includes regular filter replacement or cleaning, system checks, and monitoring water quality. Maintaining a maintenance schedule helps to prolong the lifespan of the filters and ensure the continued effectiveness of the water filtration system.

Water filtration plays a critical role in ensuring clean and safe water for your household. Understanding the different types of water filters, the importance of well location, and the equipment used for water extraction empowers homeowners to make informed decisions. Carbon filters, UV filters, and sediment filters are designed to address specific contaminants and enhance water quality. Proper well location minimizes the risk of contamination, while different water extraction equipment, such as jet pumps and submersible pumps, cater to varying well depths. Finally, regular maintenance and adherence to recommended schedules ensure the longevity and effectiveness of water filtration systems. By investing in proper water filtration, homeowners can feel comfortable and confident that the water they are consuming is clean and safe.

Foundations

The back bone of your home

The Importance of a Solid Concrete Foundation: Building the Foundation for a Better Home

When it comes to constructing a home, the foundation plays a crucial role in ensuring its stability, longevity, and overall structural integrity. A solid concrete foundation serves as the backbone of any building, providing a secure base upon which the rest of the structure is built. Let’s delve into the significance of a solid concrete foundation, from the chemistry and compressive strength of cement to the benefits of new technologies like Insulated Concrete Forms (ICF) foundations.

  1. Chemistry and Compressive Strength of Cement: At the heart of a solid concrete foundation lies the chemical properties of cement, the primary binding agent. Cement, when mixed with water, undergoes a process called hydration, forming a strong and durable material known as concrete. The compressive strength of concrete, which measures its ability to withstand compression or pressure, is a critical factor in ensuring a solid foundation. High-quality cement and proper curing techniques contribute to achieving optimal compressive strength, providing a strong and stable base for the entire structure.
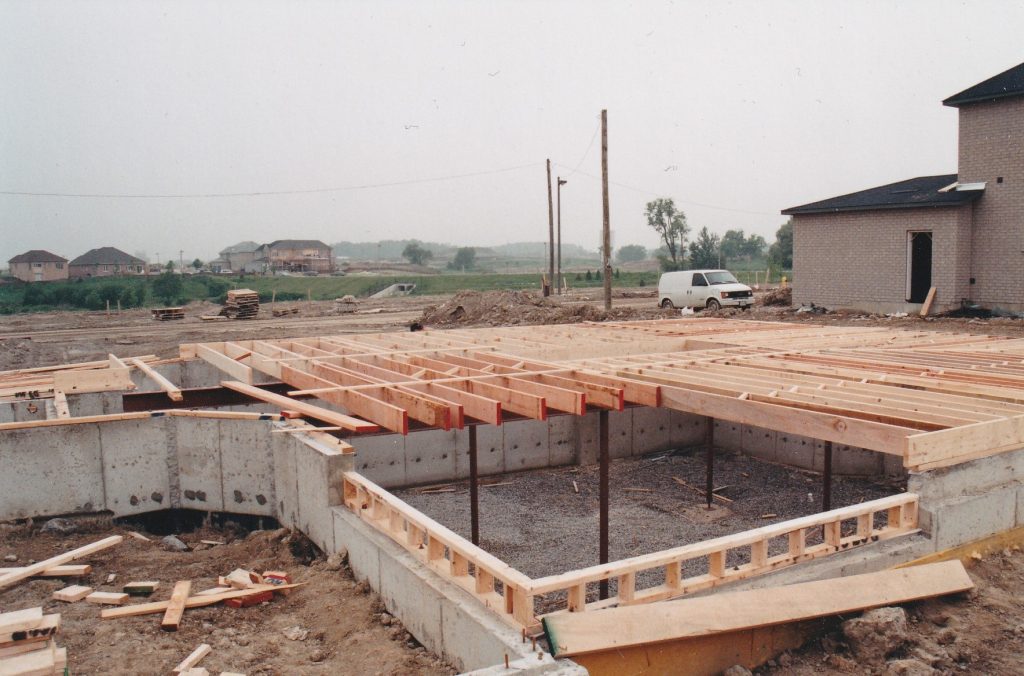
  2. Design and Trueness of Footings: The design and trueness of the footings, which are the base upon which the foundation rests, are essential for ensuring load distribution and stability. Properly designed footings distribute the weight of the structure evenly, preventing uneven settling or shifting. Precise measurements, accurate placement, and appropriate reinforcement within the footings are crucial to maintaining the integrity of the foundation.
  3. Plumb and Level Walls: Straight, plumb, and level walls are vital for a solid concrete foundation. Precise alignment ensures that the load-bearing walls above the foundation are properly supported. Level walls help prevent uneven settling, which can lead to structural issues and compromised stability. Plumb walls, perpendicular to the ground, maintain the vertical integrity of the foundation, preventing tilting or leaning.
  4. Benefits of Insulated Concrete Forms (ICF) Foundations: The advent of new technologies, such as Insulated Concrete Forms (ICF), has revolutionized foundation construction. ICF foundations offer numerous benefits, contributing to a better-built home. These forms consist of interlocking panels made of expanded polystyrene (EPS) or other insulating materials. The benefits of ICF foundations include:
    • Enhanced energy efficiency: The insulation properties of ICF help reduce heat loss, resulting in lower energy consumption and increased comfort.
    • Sound insulation: ICF foundations dampen noise transmission, providing a quieter living environment.
    • Increased durability: ICF walls are resistant to moisture, mold, and pests, ensuring long-term durability and reducing the risk of damage.
    • Improved construction speed: ICF systems allow for faster construction due to the ease of installation and reduced need for additional insulation and finishing materials.

Conclusion: A solid concrete foundation is the cornerstone of a well-built home. From the chemistry and compressive strength of cement to the design and trueness of footings, every aspect contributes to the foundation’s stability and longevity. Embracing new technologies like Insulated Concrete Forms (ICF) further enhances the benefits of a solid foundation, providing improved energy efficiency, durability, and construction speed. By prioritizing a solid concrete foundation, homeowners can ensure a structurally sound and stable home that stands the test of time.

Home Building
Foundations

The back bone of your home

The Importance of a Solid Concrete Foundation: Building the Foundation for a Better Home

When it comes to constructing a home, the foundation plays a crucial role in ensuring its stability, longevity, and overall structural integrity. A solid concrete foundation serves as the backbone of any building, providing a secure base upon which the rest of the structure is built. Let’s delve into the significance of a solid concrete foundation, from the chemistry and compressive strength of cement to the benefits of new technologies like Insulated Concrete Forms (ICF) foundations.

  1. Chemistry and Compressive Strength of Cement: At the heart of a solid concrete foundation lies the chemical properties of cement, the primary binding agent. Cement, when mixed with water, undergoes a process called hydration, forming a strong and durable material known as concrete. The compressive strength of concrete, which measures its ability to withstand compression or pressure, is a critical factor in ensuring a solid foundation. High-quality cement and proper curing techniques contribute to achieving optimal compressive strength, providing a strong and stable base for the entire structure.
  2. Design and Trueness of Footings: The design and trueness of the footings, which are the base upon which the foundation rests, are essential for ensuring load distribution and stability. Properly designed footings distribute the weight of the structure evenly, preventing uneven settling or shifting. Precise measurements, accurate placement, and appropriate reinforcement within the footings are crucial to maintaining the integrity of the foundation.
  3. Plumb and Level Walls: Straight, plumb, and level walls are vital for a solid concrete foundation. Precise alignment ensures that the load-bearing walls above the foundation are properly supported. Level walls help prevent uneven settling, which can lead to structural issues and compromised stability. Plumb walls, perpendicular to the ground, maintain the vertical integrity of the foundation, preventing tilting or leaning.
  4. Benefits of Insulated Concrete Forms (ICF) Foundations: The advent of new technologies, such as Insulated Concrete Forms (ICF), has revolutionized foundation construction. ICF foundations offer numerous benefits, contributing to a better-built home. These forms consist of interlocking panels made of expanded polystyrene (EPS) or other insulating materials. The benefits of ICF foundations include:
    • Enhanced energy efficiency: The insulation properties of ICF help reduce heat loss, resulting in lower energy consumption and increased comfort.
    • Sound insulation: ICF foundations dampen noise transmission, providing a quieter living environment.
    • Increased durability: ICF walls are resistant to moisture, mold, and pests, ensuring long-term durability and reducing the risk of damage.
    • Improved construction speed: ICF systems allow for faster construction due to the ease of installation and reduced need for additional insulation and finishing materials.

Conclusion: A solid concrete foundation is the cornerstone of a well-built home. From the chemistry and compressive strength of cement to the design and trueness of footings, every aspect contributes to the foundation’s stability and longevity. Embracing new technologies like Insulated Concrete Forms (ICF) further enhances the benefits of a solid foundation, providing improved energy efficiency, durability, and construction speed. By prioritizing a solid concrete foundation, homeowners can ensure a structurally sound and stable home that stands the test of time.

Water Softeners: Salt vs. Electronic


Salt-Based Water Softeners vs. Electronic Water Softeners: Comparing Systems for Residential Applications

Water softening systems are designed to alleviate the negative effects of hard water by removing minerals like calcium and magnesium. Two common types of water softeners used in residential applications are salt-based water softeners and electronic water softeners. In this comprehensive analysis, we will explore the differences between these systems, including their operation, pros and cons, and suitability for various household needs.

Salt-Based Water Softeners:

  1. Operation: Salt-based water softeners, also known as ion exchange systems, utilize a process called ion exchange to remove hardness minerals from water. Here’s how they work:
  • A resin tank containing ion exchange resin beads is filled with salt or sodium ions.
  • As hard water flows through the resin tank, calcium and magnesium ions are exchanged for sodium ions, effectively softening the water.
  • Periodically, the resin tank is regenerated by rinsing it with a brine solution, which replenishes the resin beads with sodium ions and flushes away the accumulated hardness minerals.
  1. Pros:
  • Highly effective: Salt-based water softeners provide efficient removal of hardness minerals, resulting in significantly reduced scaling on fixtures, pipes, and appliances.
  • Cost-effective: These systems typically have lower upfront costs compared to electronic water softeners.
  • Widely available: Salt-based water softeners have been used for many years and are readily available in various sizes and capacities.
  1. Cons:
  • Sodium content: The ion exchange process replaces calcium and magnesium ions with sodium ions, increasing the sodium content in softened water. This can be a concern for individuals on sodium-restricted diets or with specific health conditions.
  • Maintenance and regeneration: Salt-based water softeners require periodic maintenance, including refilling the salt tank and regenerating the resin beads. This maintenance can add to the overall cost and effort of using the system. Also, if your available ground water is limited you may experience periods of water shortage.

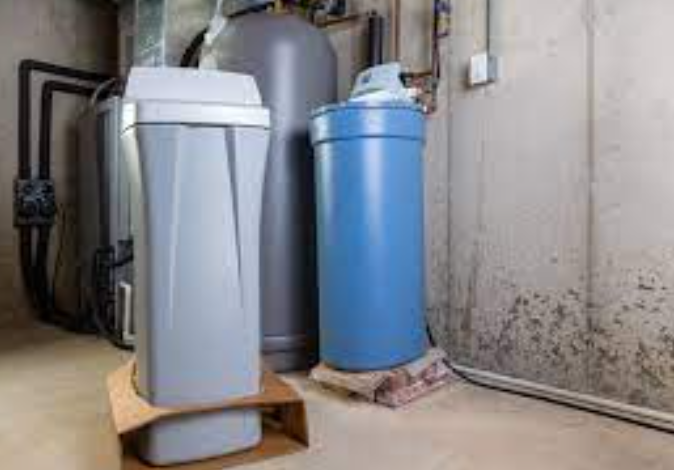
Salt Water Softener

Electronic Water Softeners:

  1. Operation: Electronic water softeners, also known as descalers or electronic descaling systems, use electromagnetic fields to alter the behavior of mineral ions in water. Here’s how they work:
  • A small electronic device is installed on the incoming water supply line.
  • The device emits electromagnetic waves that affect the charge and structure of mineral ions in the water.
  • Altered mineral ions remain soluble, preventing them from forming scale deposits on surfaces.
  1. Pros:
  • No salt or chemicals: Electronic water softeners do not require the use of salt or chemicals, making them a desirable option for individuals concerned about sodium intake or those seeking a salt-free solution.
  • Low maintenance: These systems typically require minimal maintenance, as there are no resin tanks to regenerate or salt tanks to refill.
  • Environmentally friendly: Electronic water softeners are considered environmentally friendly since they do not discharge brine waste or contribute to chloride levels in wastewater.
  1. Cons:
  • Effectiveness can vary: The performance of electronic water softeners may vary depending on water hardness levels and flow rates. They may not be as effective in extremely hard water conditions.
  • Limited testing and certification: Compared to salt-based water softeners, there is less standardized testing and certification available for electronic water softeners. This can make it challenging to evaluate their effectiveness accurately.
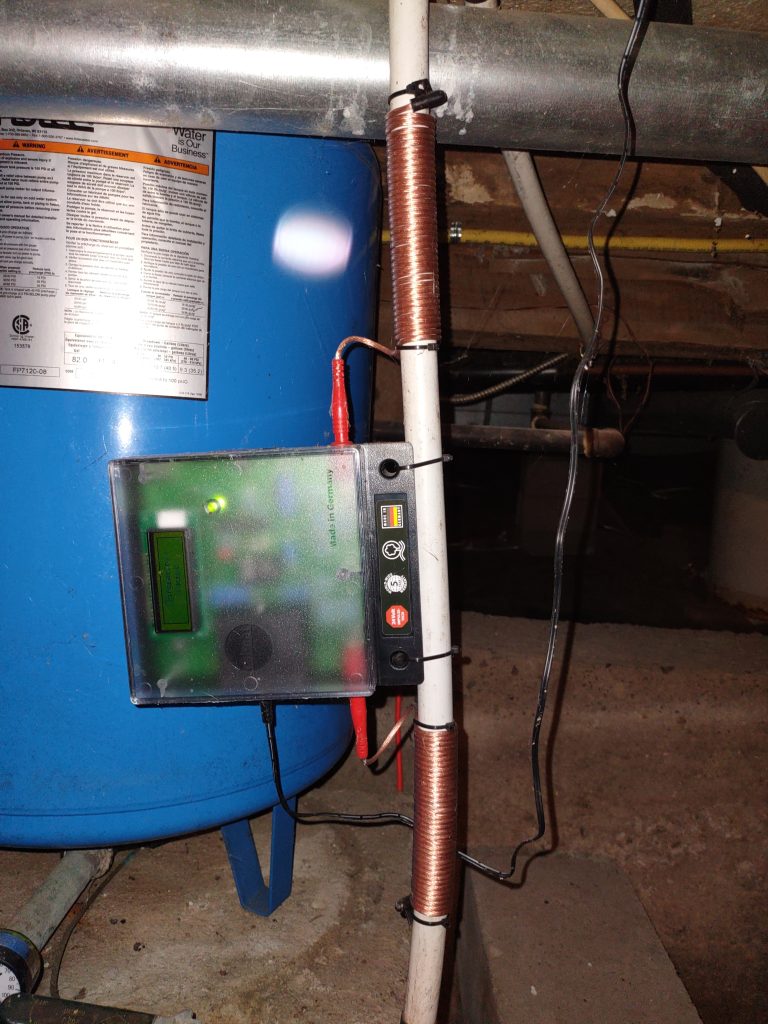
Calmat electronic water softener

Suitability for Residential Applications: Both salt-based and electronic water softeners have their place in residential applications, depending on specific needs and preferences:

  • Salt-based water softeners are well-suited for households with high water hardness levels, as they offer effective and reliable removal of hardness minerals.
  • Electronic water softeners may be preferred by those looking for a salt-free solution, individuals on sodium-restricted diets, or those seeking a low-maintenance option.

In conclusion, the choice between salt-based and electronic water softeners ultimately depends on factors such as water hardness levels, sodium intake, and mostly personal preferences. One way to decide would be to have your water tested after the well has been dug. Generally, a well with lower depth (shallow) will probably have a lower mineral content than the one that is very deep. You can opt for an electronic system in this situation but I would strongly recommend that you include a UV filter for shallow wells. They tend to have a higher bacteria count than deep wells.

Well & Septic
Water Softeners: Salt vs. Electronic


Salt-Based Water Softeners vs. Electronic Water Softeners: Comparing Systems for Residential Applications

Water softening systems are designed to alleviate the negative effects of hard water by removing minerals like calcium and magnesium. Two common types of water softeners used in residential applications are salt-based water softeners and electronic water softeners. In this comprehensive analysis, we will explore the differences between these systems, including their operation, pros and cons, and suitability for various household needs.

Salt-Based Water Softeners:

  1. Operation: Salt-based water softeners, also known as ion exchange systems, utilize a process called ion exchange to remove hardness minerals from water. Here’s how they work:
  • A resin tank containing ion exchange resin beads is filled with salt or sodium ions.
  • As hard water flows through the resin tank, calcium and magnesium ions are exchanged for sodium ions, effectively softening the water.
  • Periodically, the resin tank is regenerated by rinsing it with a brine solution, which replenishes the resin beads with sodium ions and flushes away the accumulated hardness minerals.
  1. Pros:
  • Highly effective: Salt-based water softeners provide efficient removal of hardness minerals, resulting in significantly reduced scaling on fixtures, pipes, and appliances.
  • Cost-effective: These systems typically have lower upfront costs compared to electronic water softeners.
  • Widely available: Salt-based water softeners have been used for many years and are readily available in various sizes and capacities.
  1. Cons:
  • Sodium content: The ion exchange process replaces calcium and magnesium ions with sodium ions, increasing the sodium content in softened water. This can be a concern for individuals on sodium-restricted diets or with specific health conditions.
  • Maintenance and regeneration: Salt-based water softeners require periodic maintenance, including refilling the salt tank and regenerating the resin beads. This maintenance can add to the overall cost and effort of using the system. Also, if your available ground water is limited you may experience periods of water shortage.

Salt Water Softener

Electronic Water Softeners:

  1. Operation: Electronic water softeners, also known as descalers or electronic descaling systems, use electromagnetic fields to alter the behavior of mineral ions in water. Here’s how they work:
  • A small electronic device is installed on the incoming water supply line.
  • The device emits electromagnetic waves that affect the charge and structure of mineral ions in the water.
  • Altered mineral ions remain soluble, preventing them from forming scale deposits on surfaces.
  1. Pros:
  • No salt or chemicals: Electronic water softeners do not require the use of salt or chemicals, making them a desirable option for individuals concerned about sodium intake or those seeking a salt-free solution.
  • Low maintenance: These systems typically require minimal maintenance, as there are no resin tanks to regenerate or salt tanks to refill.
  • Environmentally friendly: Electronic water softeners are considered environmentally friendly since they do not discharge brine waste or contribute to chloride levels in wastewater.
  1. Cons:
  • Effectiveness can vary: The performance of electronic water softeners may vary depending on water hardness levels and flow rates. They may not be as effective in extremely hard water conditions.
  • Limited testing and certification: Compared to salt-based water softeners, there is less standardized testing and certification available for electronic water softeners. This can make it challenging to evaluate their effectiveness accurately.
Calmat electronic water softener

Suitability for Residential Applications: Both salt-based and electronic water softeners have their place in residential applications, depending on specific needs and preferences:

  • Salt-based water softeners are well-suited for households with high water hardness levels, as they offer effective and reliable removal of hardness minerals.
  • Electronic water softeners may be preferred by those looking for a salt-free solution, individuals on sodium-restricted diets, or those seeking a low-maintenance option.

In conclusion, the choice between salt-based and electronic water softeners ultimately depends on factors such as water hardness levels, sodium intake, and mostly personal preferences. One way to decide would be to have your water tested after the well has been dug. Generally, a well with lower depth (shallow) will probably have a lower mineral content than the one that is very deep. You can opt for an electronic system in this situation but I would strongly recommend that you include a UV filter for shallow wells. They tend to have a higher bacteria count than deep wells.

Major Renovations

Major renovations and/or restorations can be very overwhelming and emotionally taxing

The Importance of Being Prepared for a Major Renovation or Restoration of Your Home

Undertaking a major renovation or restoration project for your home is an exciting yet challenging endeavor. Whether you’re upgrading an older property, adding new features, or restoring a historical gem, being prepared is essential. Proper preparation not only ensures a smooth and successful project but also minimizes stress, potential setbacks, and costly surprises along the way. Let’s explore the importance of being prepared and the steps homeowners must take when embarking on a significant renovation or restoration:

Financial Planning: Before diving into a major project, it is crucial to assess your budget and plan your finances accordingly. Evaluate the scope of work, obtain quotes from contractors or professionals, and factor in additional costs such as permits, materials, and unexpected expenses. The importance of factoring in unexpected expenses should not be under estimated. Especially if you have a very old home, or one that has suffered poor renovations over decades. This can even brake those who are financially well off seeing their project almost double in cost.

  1.  Understanding your financial limitations and having a realistic budget will help you make informed decisions and prevent financial strain during the project.
  2. Relocating During Construction: In certain cases, it may be necessary to temporarily relocate during the renovation or restoration process, especially when extensive work is being done. Consider the logistics of moving, including finding temporary accommodation, storage options, and the associated costs. Properly planning for relocation ensures that you and your belongings are protected while allowing the contractors to work efficiently and without hindrance.
  3. Addressing Possible Problems with Older Homes: Older homes may present unique challenges such as structural issues, outdated electrical or plumbing systems, or environmental concerns. Conduct a thorough inspection of the property before starting the project, and address any existing problems to prevent them from escalating during the renovation. Engaging professionals with experience in working with older homes can help identify potential issues and develop appropriate solutions.
  4. Introducing New Technologies and Sustainable Practices: During a major renovation or restoration, homeowners have an excellent opportunity to incorporate modern technologies and sustainable practices. Consider energy-efficient appliances, smart home automation, eco-friendly materials, and systems that reduce water consumption or enhance energy efficiency. Embracing these advancements not only improves the functionality and comfort of your home but also reduces long-term operational costs and environmental impact.
  5. Establishing Clear Communication: Effective communication with contractors, architects, and other professionals involved in the project is crucial for its success. Clearly express your goals, expectations, and desired outcomes. Regularly communicate and address any concerns or changes promptly. Establishing open lines of communication ensures everyone is on the same page and allows for effective problem-solving and decision-making.
  6. Reliability and Experience of Contractors: Selecting experienced and reliable contractors is vital for the smooth progress of your project. Research contractors thoroughly, check references, and review their past projects. Ensure they are properly licensed, insured, and have the necessary expertise to handle the specific requirements of your renovation or restoration. Working with reputable professionals mitigates the risk of delays, subpar workmanship, and costly mistakes.
  7. Patience and Longevity of the Project: Major renovations or restorations can be time-consuming, and unexpected challenges may arise during the process. It is crucial to have patience and realistic expectations regarding the timeline. Understand that certain aspects of the project may take longer than anticipated, especially if unforeseen issues are encountered. Maintaining a positive mindset and focusing on the long-term benefits will help you stay motivated throughout the project.

Undertaking a major renovation or restoration project for your home is a significant undertaking. Being prepared financially, planning for potential challenges, embracing new technologies, ensuring clear communication, and working with reliable professionals are all vital components of a successful project. By taking these steps and maintaining patience, you can navigate the renovation or restoration process smoothly, minimize stress, and ultimately achieve the desired results that will enhance the beauty, functionality, and value of your home for years to come.

Renovations
Major Renovations

Major renovations and/or restorations can be very overwhelming and emotionally taxing

The Importance of Being Prepared for a Major Renovation or Restoration of Your Home

Undertaking a major renovation or restoration project for your home is an exciting yet challenging endeavor. Whether you’re upgrading an older property, adding new features, or restoring a historical gem, being prepared is essential. Proper preparation not only ensures a smooth and successful project but also minimizes stress, potential setbacks, and costly surprises along the way. Let’s explore the importance of being prepared and the steps homeowners must take when embarking on a significant renovation or restoration:

Financial Planning: Before diving into a major project, it is crucial to assess your budget and plan your finances accordingly. Evaluate the scope of work, obtain quotes from contractors or professionals, and factor in additional costs such as permits, materials, and unexpected expenses. The importance of factoring in unexpected expenses should not be under estimated. Especially if you have a very old home, or one that has suffered poor renovations over decades. This can even brake those who are financially well off seeing their project almost double in cost.

  1.  Understanding your financial limitations and having a realistic budget will help you make informed decisions and prevent financial strain during the project.
  2. Relocating During Construction: In certain cases, it may be necessary to temporarily relocate during the renovation or restoration process, especially when extensive work is being done. Consider the logistics of moving, including finding temporary accommodation, storage options, and the associated costs. Properly planning for relocation ensures that you and your belongings are protected while allowing the contractors to work efficiently and without hindrance.
  3. Addressing Possible Problems with Older Homes: Older homes may present unique challenges such as structural issues, outdated electrical or plumbing systems, or environmental concerns. Conduct a thorough inspection of the property before starting the project, and address any existing problems to prevent them from escalating during the renovation. Engaging professionals with experience in working with older homes can help identify potential issues and develop appropriate solutions.
  4. Introducing New Technologies and Sustainable Practices: During a major renovation or restoration, homeowners have an excellent opportunity to incorporate modern technologies and sustainable practices. Consider energy-efficient appliances, smart home automation, eco-friendly materials, and systems that reduce water consumption or enhance energy efficiency. Embracing these advancements not only improves the functionality and comfort of your home but also reduces long-term operational costs and environmental impact.
  5. Establishing Clear Communication: Effective communication with contractors, architects, and other professionals involved in the project is crucial for its success. Clearly express your goals, expectations, and desired outcomes. Regularly communicate and address any concerns or changes promptly. Establishing open lines of communication ensures everyone is on the same page and allows for effective problem-solving and decision-making.
  6. Reliability and Experience of Contractors: Selecting experienced and reliable contractors is vital for the smooth progress of your project. Research contractors thoroughly, check references, and review their past projects. Ensure they are properly licensed, insured, and have the necessary expertise to handle the specific requirements of your renovation or restoration. Working with reputable professionals mitigates the risk of delays, subpar workmanship, and costly mistakes.
  7. Patience and Longevity of the Project: Major renovations or restorations can be time-consuming, and unexpected challenges may arise during the process. It is crucial to have patience and realistic expectations regarding the timeline. Understand that certain aspects of the project may take longer than anticipated, especially if unforeseen issues are encountered. Maintaining a positive mindset and focusing on the long-term benefits will help you stay motivated throughout the project.

Undertaking a major renovation or restoration project for your home is a significant undertaking. Being prepared financially, planning for potential challenges, embracing new technologies, ensuring clear communication, and working with reliable professionals are all vital components of a successful project. By taking these steps and maintaining patience, you can navigate the renovation or restoration process smoothly, minimize stress, and ultimately achieve the desired results that will enhance the beauty, functionality, and value of your home for years to come.

The Secrets to Ceramic

Step-by-Step Guide: Installing Ceramic Tile Flooring and Wall Tiles

Ceramic tile flooring and wall tiles add beauty and durability to any space, making them popular choices for homeowners. In this comprehensive guide, we will walk you through the step-by-step process of installing ceramic tile flooring and wall tiles. Additionally, we will highlight the use of Ditra as a subgrade for flooring installation, discuss different adhesives and thinset options, and outline the essential tools you’ll need for a successful installation.

Step 1: Prepare the Subfloor Ensure the subfloor is clean, dry, level, and structurally sound. Remove any existing flooring and fix any imperfections or unevenness. If you are using Ditra as a subgrade, follow the manufacturer’s instructions to cut and install the Ditra membrane, ensuring full coverage over the entire subfloor. If you are not using Ditra as your subsurface you can go with Hardy or cement board. Be sure to use the right fasteners and apply the fasteners on a 6″- 8″ grid. You can also go old school and install what is called a mud bed using a dry set mortar (This technique is rarely even done by professional tile setters ).

Step 2: Plan the Layout of the tiles, considering factors like room size, shape, and natural light sources. Measure and mark reference lines on the subfloor or wall to guide the installation process. First step is to locate the center of your room. Depending on the size of your tiles and whether they are metric of imperial (i.e. 300mmX300mm- 11 3/4″X11 3/4″), draw a grid for 4 to 6 tile setting per grid box. Dry lay the tiles to ensure proper alignment and make any necessary adjustments. If you have a crooked wall you have two options to hide the unevenness. You can divided the error of crooked walls by measuring the center of each wall which will reduce the difference in cut tiles along the edge of a wall (Make sure your initial center lines maintain their 90 degrees). Or, you can mark your first line parallel to the most visually noticeable wall as you enter the room. i.e. Making your tiles parallel to a long bank of kitchen cabinets, where the crooked wall will be hidden perhaps by furniture or appliances.

Step 3: Prepare the Tiles and Materials: Prepare the ceramic tiles by checking for any defects or damage. Some tiles that have a more natural look quite often are designed to be slightly different in size. This is to create an older look as if the tiles were actually hand made. A slightly wider grout line really compliments this style of tile. Mix the thinset or adhesive according to the manufacturer’s instructions. Ensure you have the correct type of adhesive for your specific tile and substrate. If you are installing white marble, make sure you are using the white thinset. The grey one will bleed through your tile and create stains. I strongly recommend you purchase you tiles and supplies at a wholesaler. Their staff are far more knowledgeable than those at a retail hardware store. Also, their selection will be greater and quality much higher.

Step 4: Install the Tiles For floor tile installation:

  • Apply a thin layer of thinset or adhesive to a small section of the subfloor using the appropriate notched trowel. Apply a thin flat layer of glue to the back of the tile.
  • Press the tiles firmly into place, using spacers to maintain consistent spacing between tiles.
  • Use a level to ensure the tiles are even and aligned correctly.
  • Continue applying thinset and laying tiles in small sections until the entire floor is covered.

For wall tile installation:

  • Apply a layer of thinset or adhesive to the wall using again the appropriate notched trowel. Can be ‘V’ notched or square depending on the size and weight of tile.
  • Press the tiles firmly into place, using spacers to maintain consistent spacing between tiles.
  • Use a level to ensure the tiles are plumb and aligned correctly.
  • Continue applying thinset and laying tiles in small sections until the entire wall is covered.

Step 5: Grouting Once the tiles are firmly in place, allow them to set according to the adhesive manufacturer’s instructions. Then, remove the spacers and mix the grout according to the manufacturer’s instructions. Apply the grout using a grout float, ensuring all joints are filled. Your grout should be the consistency of tooth paste.

Step 6: Clean and Finish After the grout has set for the recommended time, use a damp sponge to remove excess grout from the tile surfaces. Rinse the sponge frequently to achieve a clean finish. Wipe any residue off the surface with a clean dry cloth. Allow the grout to cure fully before subjecting it to heavy foot traffic or moisture.

Step 7: Sealing (Optional) Depending on the type of ceramic tile and the manufacturer’s recommendations, you may choose to apply a sealant to protect the tiles and grout from stains and moisture. Follow the sealant manufacturer’s instructions for application and curing times.

Essential Tools:

  • Ditra membrane (for floor tile installation)
  • Tiles and spacers
  • Notched trowel
  • Tile cutter or wet saw
  • Level
  • Grout float
  • Sponge
  • Bucket for mixing thinset or adhesive
  • Grout mix and grout sealer (if applicable)
  • Safety equipment (gloves, goggles, knee pads)

Conclusion: By following these step-by-step instructions, you can confidently install ceramic tile flooring and wall tiles, using Ditra as a subgrade for flooring installation. Remember to properly prepare the subfloor or wall, choose the right adhesives and thinset, and use the recommended notched trowel for the application.

I strongly recommend the use of Ditra as opposed to added layer of plywood or cement boards. The secret of Ditra is it completely separate the movement of your subfloor (of natural expansion and contraction of the wood) from the finished ceramic tile flooring. From decades of installing ceramic tiles in many projects, we never had a single call back or problem with floor tiles when we used Ditra as a subgrade.

Renovations
The Secrets to Ceramic

Step-by-Step Guide: Installing Ceramic Tile Flooring and Wall Tiles

Ceramic tile flooring and wall tiles add beauty and durability to any space, making them popular choices for homeowners. In this comprehensive guide, we will walk you through the step-by-step process of installing ceramic tile flooring and wall tiles. Additionally, we will highlight the use of Ditra as a subgrade for flooring installation, discuss different adhesives and thinset options, and outline the essential tools you’ll need for a successful installation.

Step 1: Prepare the Subfloor Ensure the subfloor is clean, dry, level, and structurally sound. Remove any existing flooring and fix any imperfections or unevenness. If you are using Ditra as a subgrade, follow the manufacturer’s instructions to cut and install the Ditra membrane, ensuring full coverage over the entire subfloor. If you are not using Ditra as your subsurface you can go with Hardy or cement board. Be sure to use the right fasteners and apply the fasteners on a 6″- 8″ grid. You can also go old school and install what is called a mud bed using a dry set mortar (This technique is rarely even done by professional tile setters ).

Step 2: Plan the Layout of the tiles, considering factors like room size, shape, and natural light sources. Measure and mark reference lines on the subfloor or wall to guide the installation process. First step is to locate the center of your room. Depending on the size of your tiles and whether they are metric of imperial (i.e. 300mmX300mm- 11 3/4″X11 3/4″), draw a grid for 4 to 6 tile setting per grid box. Dry lay the tiles to ensure proper alignment and make any necessary adjustments. If you have a crooked wall you have two options to hide the unevenness. You can divided the error of crooked walls by measuring the center of each wall which will reduce the difference in cut tiles along the edge of a wall (Make sure your initial center lines maintain their 90 degrees). Or, you can mark your first line parallel to the most visually noticeable wall as you enter the room. i.e. Making your tiles parallel to a long bank of kitchen cabinets, where the crooked wall will be hidden perhaps by furniture or appliances.

Step 3: Prepare the Tiles and Materials: Prepare the ceramic tiles by checking for any defects or damage. Some tiles that have a more natural look quite often are designed to be slightly different in size. This is to create an older look as if the tiles were actually hand made. A slightly wider grout line really compliments this style of tile. Mix the thinset or adhesive according to the manufacturer’s instructions. Ensure you have the correct type of adhesive for your specific tile and substrate. If you are installing white marble, make sure you are using the white thinset. The grey one will bleed through your tile and create stains. I strongly recommend you purchase you tiles and supplies at a wholesaler. Their staff are far more knowledgeable than those at a retail hardware store. Also, their selection will be greater and quality much higher.

Step 4: Install the Tiles For floor tile installation:

  • Apply a thin layer of thinset or adhesive to a small section of the subfloor using the appropriate notched trowel. Apply a thin flat layer of glue to the back of the tile.
  • Press the tiles firmly into place, using spacers to maintain consistent spacing between tiles.
  • Use a level to ensure the tiles are even and aligned correctly.
  • Continue applying thinset and laying tiles in small sections until the entire floor is covered.

For wall tile installation:

  • Apply a layer of thinset or adhesive to the wall using again the appropriate notched trowel. Can be ‘V’ notched or square depending on the size and weight of tile.
  • Press the tiles firmly into place, using spacers to maintain consistent spacing between tiles.
  • Use a level to ensure the tiles are plumb and aligned correctly.
  • Continue applying thinset and laying tiles in small sections until the entire wall is covered.

Step 5: Grouting Once the tiles are firmly in place, allow them to set according to the adhesive manufacturer’s instructions. Then, remove the spacers and mix the grout according to the manufacturer’s instructions. Apply the grout using a grout float, ensuring all joints are filled. Your grout should be the consistency of tooth paste.

Step 6: Clean and Finish After the grout has set for the recommended time, use a damp sponge to remove excess grout from the tile surfaces. Rinse the sponge frequently to achieve a clean finish. Wipe any residue off the surface with a clean dry cloth. Allow the grout to cure fully before subjecting it to heavy foot traffic or moisture.

Step 7: Sealing (Optional) Depending on the type of ceramic tile and the manufacturer’s recommendations, you may choose to apply a sealant to protect the tiles and grout from stains and moisture. Follow the sealant manufacturer’s instructions for application and curing times.

Essential Tools:

  • Ditra membrane (for floor tile installation)
  • Tiles and spacers
  • Notched trowel
  • Tile cutter or wet saw
  • Level
  • Grout float
  • Sponge
  • Bucket for mixing thinset or adhesive
  • Grout mix and grout sealer (if applicable)
  • Safety equipment (gloves, goggles, knee pads)

Conclusion: By following these step-by-step instructions, you can confidently install ceramic tile flooring and wall tiles, using Ditra as a subgrade for flooring installation. Remember to properly prepare the subfloor or wall, choose the right adhesives and thinset, and use the recommended notched trowel for the application.

I strongly recommend the use of Ditra as opposed to added layer of plywood or cement boards. The secret of Ditra is it completely separate the movement of your subfloor (of natural expansion and contraction of the wood) from the finished ceramic tile flooring. From decades of installing ceramic tiles in many projects, we never had a single call back or problem with floor tiles when we used Ditra as a subgrade.

Stepping on New Flooring

A DIY Guide: Installing Laminate, Engineered, and Solid Wood Flooring

Introduction: Installing laminate, engineered, or solid wood flooring can enhance the beauty and value of your home. Whether you’re a seasoned DIY enthusiast or a first-time homeowner looking to embark on a flooring project, this step-by-step guide will help you achieve professional-looking results. Let’s dive into the process of installing these popular flooring options.

Step 1: Prepare the Subfloor Ensure that the subfloor is clean, dry, level, and structurally sound. Remove any existing flooring and fix any imperfections or unevenness. Use a moisture meter to check the subfloor’s moisture content and ensure it falls within the acceptable range for the specific flooring material.

Step 2: Acclimate the Flooring: Unbox the laminate, engineered, or solid wood flooring and let it acclimate in the installation area for the recommended time, usually 48 to 72 hours. This allows the flooring to adjust to the temperature and humidity of the space, minimizing the risk of warping or buckling later.

Step 3: Lay Underlayment (if required) For laminate or engineered wood flooring, installing underlayment is often necessary to provide cushioning, moisture protection, and noise reduction. Follow the manufacturer’s instructions to lay the underlayment over the entire subfloor, ensuring it is properly aligned and secured. For solid wood flooring, install a layer of felt paper. This will reduce or eliminate any potential squeaking that occurs from floor movement in high traffic areas. Note that with pre-finished hard wood flooring the squeaking occurs between the slats of wood and is virtually impossible to completely eliminate. Coatings are usually polyurethane based and applied on all edges creating the occasional squeaking sound whenever any weight is applied to the surface. A proper installation is vital to reduce or eliminate the possibility of any squeaking.

Step 4: Plan the Layout Plan the layout of the flooring, considering factors like room size, shape, and natural light sources. Measure and mark reference lines on the subfloor to guide the installation process. Begin the installation from the longest straight wall, as it will provide a reference point for aligning the flooring.

Step 5: Install the First Row Start by placing spacers along the walls to create a small expansion gap. Lay the first row of flooring, ensuring the tongue side faces the wall. Use a tapping block and a mallet to snugly fit the planks together. Make sure each row is straight and aligned by using a pull bar and rubber mallet.

Step 6: Continue Installation Continue installing subsequent rows, interlocking the planks according to the manufacturer’s instructions. Stagger the end joints by at least 8 inches for stability and an aesthetic appeal. Use a pull bar, tapping block, and rubber mallet to ensure each plank is securely locked in place.

Step 7: Cut and Trim As you approach the walls or obstacles, you will likely need to cut and trim the flooring planks. Use a circular saw, jigsaw, or a miter saw to make accurate cuts. Remember to leave an expansion gap around all fixed objects to allow for natural movement, especially with solid wood. It’s important to understand the structure of wood to understand how it reacts to it’s environment. The cellular structure of wood is longitudinal (parallel) with it’s grain. So when humidity and heat go up, a plank of solid wood will expand. And as the heat and humidity go down, it will contract. Always perpendicular to it’s length. See image below

Expansion & Contraction

Step 8: Finish the Installation: Complete the installation by installing the final row of flooring. Remove spacers and install baseboards or molding to cover the expansion gaps. Use appropriate transition pieces to create smooth transitions between different flooring materials or areas.

Step 9: Cleaning and Maintenance Once the flooring is installed, thoroughly clean it to remove any dust or debris. Follow the manufacturer’s instructions for specific cleaning and maintenance recommendations to keep your new floor looking its best for years to come.

Conclusion: By following these step-by-step instructions, you can confidently install laminate, engineered, or solid wood flooring in your home. Remember to prepare the subfloor properly, plan the layout, use the right tools, and pay attention to manufacturer guidelines. With patience and attention to detail, you’ll enjoy a beautiful, durable, and professionally installed floor that adds value and style to your living space. Happy flooring!

Renovations
Stepping on New Flooring

A DIY Guide: Installing Laminate, Engineered, and Solid Wood Flooring

Introduction: Installing laminate, engineered, or solid wood flooring can enhance the beauty and value of your home. Whether you’re a seasoned DIY enthusiast or a first-time homeowner looking to embark on a flooring project, this step-by-step guide will help you achieve professional-looking results. Let’s dive into the process of installing these popular flooring options.

Step 1: Prepare the Subfloor Ensure that the subfloor is clean, dry, level, and structurally sound. Remove any existing flooring and fix any imperfections or unevenness. Use a moisture meter to check the subfloor’s moisture content and ensure it falls within the acceptable range for the specific flooring material.

Step 2: Acclimate the Flooring: Unbox the laminate, engineered, or solid wood flooring and let it acclimate in the installation area for the recommended time, usually 48 to 72 hours. This allows the flooring to adjust to the temperature and humidity of the space, minimizing the risk of warping or buckling later.

Step 3: Lay Underlayment (if required) For laminate or engineered wood flooring, installing underlayment is often necessary to provide cushioning, moisture protection, and noise reduction. Follow the manufacturer’s instructions to lay the underlayment over the entire subfloor, ensuring it is properly aligned and secured. For solid wood flooring, install a layer of felt paper. This will reduce or eliminate any potential squeaking that occurs from floor movement in high traffic areas. Note that with pre-finished hard wood flooring the squeaking occurs between the slats of wood and is virtually impossible to completely eliminate. Coatings are usually polyurethane based and applied on all edges creating the occasional squeaking sound whenever any weight is applied to the surface. A proper installation is vital to reduce or eliminate the possibility of any squeaking.

Step 4: Plan the Layout Plan the layout of the flooring, considering factors like room size, shape, and natural light sources. Measure and mark reference lines on the subfloor to guide the installation process. Begin the installation from the longest straight wall, as it will provide a reference point for aligning the flooring.

Step 5: Install the First Row Start by placing spacers along the walls to create a small expansion gap. Lay the first row of flooring, ensuring the tongue side faces the wall. Use a tapping block and a mallet to snugly fit the planks together. Make sure each row is straight and aligned by using a pull bar and rubber mallet.

Step 6: Continue Installation Continue installing subsequent rows, interlocking the planks according to the manufacturer’s instructions. Stagger the end joints by at least 8 inches for stability and an aesthetic appeal. Use a pull bar, tapping block, and rubber mallet to ensure each plank is securely locked in place.

Step 7: Cut and Trim As you approach the walls or obstacles, you will likely need to cut and trim the flooring planks. Use a circular saw, jigsaw, or a miter saw to make accurate cuts. Remember to leave an expansion gap around all fixed objects to allow for natural movement, especially with solid wood. It’s important to understand the structure of wood to understand how it reacts to it’s environment. The cellular structure of wood is longitudinal (parallel) with it’s grain. So when humidity and heat go up, a plank of solid wood will expand. And as the heat and humidity go down, it will contract. Always perpendicular to it’s length. See image below

Expansion & Contraction

Step 8: Finish the Installation: Complete the installation by installing the final row of flooring. Remove spacers and install baseboards or molding to cover the expansion gaps. Use appropriate transition pieces to create smooth transitions between different flooring materials or areas.

Step 9: Cleaning and Maintenance Once the flooring is installed, thoroughly clean it to remove any dust or debris. Follow the manufacturer’s instructions for specific cleaning and maintenance recommendations to keep your new floor looking its best for years to come.

Conclusion: By following these step-by-step instructions, you can confidently install laminate, engineered, or solid wood flooring in your home. Remember to prepare the subfloor properly, plan the layout, use the right tools, and pay attention to manufacturer guidelines. With patience and attention to detail, you’ll enjoy a beautiful, durable, and professionally installed floor that adds value and style to your living space. Happy flooring!